Combine Electron and Python with this code template
In this tutorial you will learn how to set up an Python® app with an Electron GUI. You will use Electron on the front end and Python at the back end, using a code template that I’ve put together.

Why did I create this boilerplate code?
While writing my Master thesis I used a lot of MATLAB, and recently I decided to dive into NumPy. I wanted to create a GUI for one of them and I found some articles describing how to combine Python with Electron. This sounded like an awesome idea.
In case you didn’t know, Electron is a framework to build cross platform apps with HTML, CSS, and Node.js. These happens to be the technologies you learn at FreeCodeCamp.
Before we get started: I am standing on the shoulders of giants. The code and method comes from a blog post by Andy Bulka and code by fyears. A lot of kudos to them!
But since the code presented by them still needed a lot of work to set up, I wanted to simplify this process. You now have a repository with a template that is easy to set up and that you can extend as you wish.
Prerequisities
You will need:
- Node.js
- Python 3
- Python 2 (I’ve used 2.7 successfully)
- If you use Windows: MS Build Tools (the node package windows-build-tools will help you with this.
- If you use Mac: Xcode tools.
In case you wonder why we need Python2: it is needed for the compilation of one of the Node.JS modules used (zerorpc). I’ve set up two virtual environments and switch to the Python2 venv when necessary.
How to get started - Quick start
- Clone the repository available at https://github.com/mannidung/electron-python-boilerplate.
- Set up a Python2 and a Python3 virtual environment.
- Activate the Python2 venv.
- Run npm install. This will install and compile zerorpc. Zerorpc is the interprocess communication (IPC) system used for coupling Python and Electron.
- Run npm run npm-install. No, this is not a typo. The script npm-install, available in package.json, runs the two commands electron-rebuild and npm install. The electron-rebuild command isn’t necessary if your version of Node.js is the same as the one used for the precompiled Electron package.
- Deactivate the Python2 venv
- Activate the Python3 venv.
- Run pip install -r server/requirements.txt. This installs the necessary Python packages.
- If you are on windows: run pip install -r server/requirements_win.txt. This installs pypiwin32.
- Test the app by running npm start.
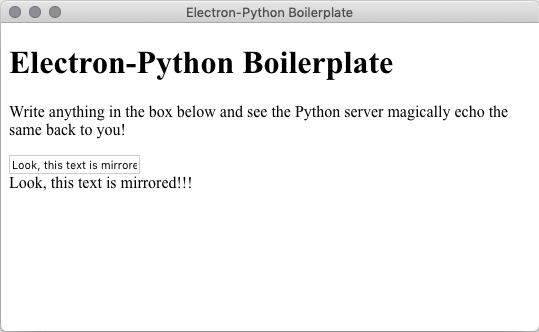
And that’s it! You should now see a window with some text, and an input field. Everything you type in this input field will be echoed back below the box. This echoing is made by sending the text to the Python server, which sends it back.

You can now package this app with one of the included scripts (see package.json)
- Run npm package-mac to create a package for Mac.
- Run npm package-win to create a package for Windows.
There is currently no script for Linux, but this will come as soon as I have access to a Linux computer. Or you could write it and send me a pull request ;-).
The package is now a standalone app. You can distribute it to friends and family, and they can use it without installing any extra stuff. Quite neat, huh?
How to modify for your own purposes
Of course, you want your app to do something cooler than just repeating back the text to you. To do this, you need to understand how to set up an Electron-Python app using this frame work. The mechanics is similar to how a web front end works when communicating with a web API. Your front end is written in JavaScript, HTML, and CSS, and with the help of a client it communicates with the back end. You can find the client in the directory client/.
The back end is running Python, and you can find a stub API in the directory server/. This API is exposed through a zerorpc server which accepts communication over TCP.
Thankfully, it is easy to extend both the back end and the front end to fit your purpose. And since the IPC is communicating via sending messages, it forces you to have a strict separation between the GUI and the back end. Your code will be nice and clean!
In server/ you find the class API in API.py:
class API():
    """"""
    def echo(self, text):
        print("API.echo() called...")
        return text
This defines the echo(self, text)-function that is called from JavaScript. It does nothing more than returning the text that it receives as input. A perfect function for a demo!
The client contains a bit more code for setting it up, and I just show the important part of api_client.js here:
const API = {
    echo: (text, callback) => {
        // Invoke command on server side
        client.invoke("echo", text, (error, result) => {
            if(error) {
                console.error(error)
                return null
            } else {
                callback(result)
            }
        })
    }
}
It’s quite straightforward. Using the client.invoke()-function we call the function “echo” on the server side, sending the argument “text”. A callback function processes the result. The object client has been set up previously in the file, see api_client.js in the repository for more details.
You can now extend these files as you want to extend your API.
What are potential pitfalls?
The steps above makes the process seem easy, but the setup of this boilerplate code gave me a lot of headache. To make your troubleshooting easier, I want to go through some of the problems here.
There are some things that can go wrong with the communication between the server and the client. The server is started automatically by the main Node process. But for this the paths have to be correctly configured, and the correct paths changes depending on if the app has been packaged. Currently, the app guesses if it has been packaged, depending on if the directory for the packaged python package exists. The keyword here is guess. This method isn’t working 100% of the time. If you get any strange errors about the server not starting, start looking here.
I have had several problems with the Python virtual environments. I still don’t know why, but I had troubles switching between them. Python often complained that the module zerorpc wasn’t working. This could also be caused by my IDE, Visual Studio Code, when it tries to switch between venvs. Often, this was solved by deactivating and reactivating the virtual environment.
Remember to use callbacks when communicating with the Python server! This is probably obvious for someone who is used to writing code in Node.js. I am not, so it took me a while to figure this out. Just keep it in mind.
Give me feedback!
I need your feedback to improve on this code. As a disclaimer, I mainly develop on Mac OS X, so I’m probably going to find bugs faster on Mac than on Windows. If you are developing on Windows and find any issues, let me know, or fix it and send me a pull request.
If you have feedback on this tutorial, please let me know.
I really like the idea of writing GUIs for Python using web technologies and I hope that this code can help you as well. And if it does, feel free to share it on social media.
“Python” and the Python logos are trademarks or registered trademarks of the Python Software Foundation
